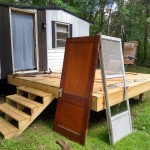
The main trailer door was in bad shape.
It was actually the third door to be in bad shape. The first, the original door to the trailer, had peeled and rotted away from years of disuse and exposure to the elements thanks to both a lack of weather protection around the frame and the trailer having sat in the yard at a slight tilt for many years. The second door was a hollow-core interior door that fell apart almost immediately and never fit well into the existing frame. And the latest door was a hastily hung interior door from my house that couldn’t even latch. Gaps wide enough to fit a determined housecat existed along the top and bottom of the door frame. The new deck looked so nice that it made the door seem even worse by comparison, so it was time to give this project the attention it deserved.
The problem with mobile homes, especially older, smaller ones, is that pretty much everything is at a reduced dimension compared to normal construction. This saves space and weight, which are important for the “mobile” part of a mobile home. But it makes finding replacement materials and effecting proper repairs a little challenging. A standard rough opening for an exterior door is 82 1/2″ tall, minimum. The rough opening for the trailer is less than 79″. There are specialty mobile home catalogs and suppliers out there, but you certainly pay for the privilege of custom-fit parts. The cheapest exterior door assembly I found during my initial research was over $300 and it was pretty plain and flimsy looking. I knew Menards had steel exterior doors for around half that price, but at a standard height. Could I actually cut down a door like that?
I stumbled across instructions (thank you, Dustin Rodgers!) that tackled my exact problem, even using a Menards-brand door. With a new confidence in my abilities, I started watching the Menards sales flyers, waiting for one of the 11% sales. I lucked out; pretty soon there was a promo on their Commander exterior doors and both the model with the small half-moon window and the plain six-panel door would only cost $100 after rebate. I opted for the window.
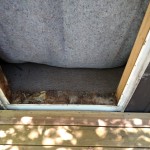
The door stayed in the pole barn for a few weeks until I could devote enough time to the project. I didn’t want to have to abandon things halfway through and end up with a nice big hole in the side of the trailer. It was a hot Saturday morning when I finally got around to tackling this, so I started by removing the interior door trim and hanging a thick moving blanket above the inside of the door frame. I figured it would at least offer some insulation from the heat and keep bugs out, and it ended up doing a pretty good job.
I took off the storm door, which just screwed to the outside of the trailer, and cleaned up the mounting surface the best I could. The brickmould of the new door frame would seal against this same surface, so it needed to be prepped properly to avoid the water problems that plagued the old doors for years. The existing door frame came away without much trouble just by virtue of being so rotten. That’s when I noticed the floor.
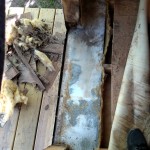
I always suspected the water issue went further than just the door, and one look at the condition of the plywood subfloor confirmed that suspicion. I peeled back the carpet and noticed, thankfully, that the water damage stopped a little over a foot in and around the door frame. So before I could even worry about cutting or hanging the new door, I had to now work on replacing a 55″ x 16″ section of flooring. Thanks to my Dremel Multi Max, this went really quickly. This tool helps out so much with demo work; you can get angles and cuts that would be otherwise impossible. I lifted out the debris and set to replacing it with new, sturdy material.
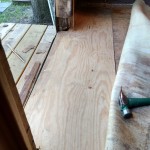
The ductwork for the furnace runs along the outside edges of the trailer and had a thin layer of fiberglass insulation separating it from the subfloor. That was pretty much trashed by the years of water damage, so I replaced it with a small section of what my grandpa used to call his “space-age insulation,” a reflective bubble wrap product he had salvaged from the Custom Craft waste bins years ago. After cutting, fitting, and screwing in a piece of 3/4″ plywood from the pole barn wood supply and shoring up the trailer wall with a section of 2×6, it was time to focus on the new door.
I followed the steps in the Instructable and the whole thing went very smoothly, taking much less time than I had anticipated. I was able to use my Multi Max in places where a chisel or router were suggested, which I’m sure was a major factor in cutting down the cut down time. The door hung perfectly on the first test fit and shimmed up nice and plumb in a hurry. I used almost three whole tubes of silicone to seal the door to the trailer and seal the gaps where the brickmould and sill meet the door frame. This thing is watertight. A few well-hidden screws later, and I was looking at a sturdy, solid new front door and frame.
I installed a Kwikset SmartKey doorknob so I could key the trailer the same as my house and cleaned up and reapplied the interior trim. The whole project turned out better than I anticipated, even with the floor rot throwing me a curveball. The door and the deck really help this trailer look more inviting. If I had known it’d be so easy to modify a steel door, I would have done this years ago!
- First thing’s first: get the old doors out of there. We had been using an old interior door that didn’t even latch or hang properly in the frame.
- For years, the trailer sat at an angle that allowed water to collect around the door frame. The frame itself was rotten, as well as a large section of the floorboards and part of the trailer wall.
- There was no sense in putting a new door on a rotten floor. I cut rather liberally around the affected section.
- The heating duct that ran below the door had a light layer of fiberglass insulation between it and the subfloor. I replaced that with some of the reflective bubble wrap insulation my grandpa always kept around.
- Cut and dropped in a 3/4″ section of plywood I found in the pole barn. The floor’s solid and ready for the door. I cut out and replaced the rotten section of wall as well.
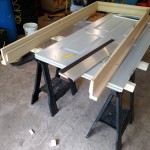
- The first step in resizing the door to fit is to cut down the frame.
- It takes a little more work to resize the door itself. Once everything was prepared, I sealed the bottom plate back in with silicone and hammered the metal lip over it.
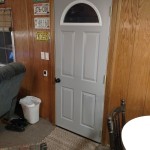
- I’m glad I went with the half-moon window; it adds a nice, homey touch. I was able to reuse the interior trim so the whole thing looks like it always belonged there.




0 Comments
1 Pingback